Tuesday, November 25, 2008

Nestabilities: Tip #7: Decorative Edges on Cards

You can make a beautiful, embossed edge for your cards using your Nestabilities. The extra long rectangles work best for the long edge of a card but if you want to put an edge on a mat or other card element you can use a smaller Nestie.

Position your die on your card with the lower edge under the raised cutting edge and the top of the card (fold) on top of the flat side of the die. This way you will only cut on one edge. Tape in place with removable tape so it doesn't shift when you cut it out. Put into your die cutting machine as usual.


You can also emboss your card edge (using the tan embossing mat) to give it a nice finish. You'll notice that you get an impression of the other edge of the die on the top of your card. There are a couple of things you can do with this. One, cover it up with another layer of cardstock or patterned paper or two, use it in your card design.


Here's my finished card. I chose to cover up the impression on top for this card.

Supplies: Cardstock (Papertrey Ink - kraft, white; Stampin' Up), Patterned Paper (My Mind's Eye), Stamps (Cornish Heritage Farms - mice; Whipper Snapper - sentiment), ink (Adirondak, Ranger), Copic markers, ribbon (Stampin' Up!), jingle bell, die cuts (Nestabilities)

Monday, November 24, 2008

Nestabilities: Tip #6 - Add decorative elements to boxes and bags

I love using my Nestabilities dies to add decorative elements and accents to gift bags and boxes. Tonight's project is a 2,5,7,10 box. I won't go through the full tutorial because I've done a very similar box before in the Cuttlebug Mania post.To make this box you will need one piece of 8.5x11 cardstock, scraps of cardstock for tags and other accents, acetate and ribbon. Add stamps and other decorations to your hearts desire. IN this particular box, I put the cardstock through my Cuttlebug snowflake embossing folder, inked it up with white craft ink and then added some clear embossing powder.


The first place I'll be using my Nestabilities is on the flap that will become the box closure. I want to give it a decorative edge so I pass it through the die so that I'm only going to be cutting one edge. Make sure that only the part of the box you want to cut is on top of the cutting edge of the die (the raised outline of the die). Then run it through your die cutting machine as your normally would. You can emboss the edge if you like.


This is what my flap looks like after it has been cut. You can do this with any die that is large enough to slip your flap or card edge through.


The next place I'm using my dies is to add a decorative window to the front of my box. I select a die (Label 2) and place it on the inside of the box where I want the window to appear. Tape it down with removeable adhesive so it doesn't slip out of place when you put it into your diecutting sandwhich. Again - make sure that only the area you want cut is on top of the raised die cutting edge. I folded the rest of the box behind the die (on the flat side) to make sure that I didn't accidentally cut through multiple panels.


Here is what the window looks like after cutting. You can put a piece of clear transparency or acetate behind the window to allow your box recipient to see the treats inside.


This is the finished box. I also made a little tag from my Nesties to add to the box closure. Fill it with holiday treats and you're ready to go! A very simple, but fun gift to give to a co-worker or neighbour.

Supplies: Cardstock (Papertrey Ink, Stampin' Up!, Bazzill), Stamps (Taylored Expressions), embossing folder (Cuttlebug), Diecuts (Nestabilities - scalloped oval, label 2, scalloped rectangle, classic square), Copic markers, acetate, ribbon (Papertrey Ink), eyelets, ink (Stampin' Up!) embossing powder.

Saturday, November 22, 2008

Nestabilities: Tip #5 - 3D Embellishments

So, I did not forget that I was in the middle of ten great things to do with your Nesties. Unfortunately my week did not yield me as much creating time as I thought it might...


Anyway, let's forget about my little hiatus and get back to making great things with out Nestabilities! Tonight's edition is 3D accent and embellishments. This is fun and easy to do with your Nestabilities dies.


You will need to cut about 8-10 oval or circle diecuts from your Nesties. Use a smaller size because these will be going on a card. I like the look of the scalloped dies but you can use the classic regular dies if you like. Don't bother embossing them because its not important for this technique.


You will need to fold or score each diecut through the centre. You can use a scoring tool like a Scor-pal or scoring blade or just fold them in half and crease the fold with a bone folder.


You will have a pile like this when you're done. If you've scored on the wrong side (like I did above), don't worry because you can just fold it back the other way. The fold should be so the right sides of the paper come together.


Using a strong adhesive like sticky strip, red tape or glue dots, adhere the wrong side of one panel to the wrong side of another panel, matching them up (this is where its actually easier to use a scallop die because you can tell if they are matched up properly). Continue in this manner until you have used up all your folded pieces.


You should have two "free" panels left when you are done. Put adhesive on these panels but do NOT glue them together. Instead, place the two panels flat onto the card or other item that you want to embellish. You may want to "fluff" up your panels a bit once you're got it down to make sure they are even.


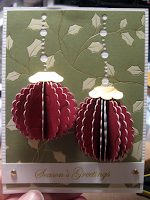
Here is a finished card using this technique to mimic 3D ornaments. You are only limited by your imagination for this - use them to depict anything that the shape will lend itself to - think beach balls, pumpkins, the sun, the top of a tree...skies the limit. You can alternate colours of cardstock for a different look as well.

You can't mail this card as the image will not flatten out to go into an envelope, but its a nice card to hand deliver to someone.


Supplies: Cardstock (Bazzill), patterned paper (SEI), brads, stamp (Whipper Snapper), Ink (Stampin' Up!)


Instead of laying this flat on a card, you can also make a free-hanging ornament using this technique. Diecut 16 or more scalloped circles with your nestabilities. You can use any size you want - the diameter of the circle will be the diameter of your ornament.

When you have reached the halfway mark of attaching your diecuts to each other (in my case - 8), attach a loop of ribbon the backside so that it is enclosed in the ornament as you continue around.


When you reach the end, attach the adhesive as in the card above, but this time, glue the two free panels to each other to form a full circle. I added a small tag and tied to the ribbon in a knot at its base to make this very simple ornament.


Supplies: Glossy cardstock (unknown), Stamps (Stampin' Up! - So Swirly wheel, Whipper Snapper - sentiment), Inks (Tsukineko, Stampin' Up!), embossing powder (clear, silver), ribbon, diecuts (Nestabilities - scalloped circles, Quickutz - tag).

Sunday, November 16, 2008

Nestabilities: Tip #4 - Window Cards and Embossed Cards

We've all seen those wonderful window cards or embossed front cards that you can purchase at your LSS or big box craft store. As much as I love them, they never seem to come in the size, colour or style that I want. But not to worry...you can use your Nestabilities to create your own window and embossed card bases in colours and styles to match your own designs.


Take your card base and place your Nestabilities die of choice in the position where you would like to have your window. A lot of people have special techniques for getting the die and cardstock into your diecutting sandwich without shifting them, but I say use a removable adhesive. It will hold everything together until you are finished cutting.


When it comes through the diecutting machine your cardfront will look something like this.


If you want to emboss around your card window, select another, slightly larger die, and centre it around your already cut window. Use your removable tape to hold it in place on your paper. To emboss the card front in a Cuttlebug diecutting machine you need to use the following sandwich:
1.
Plate A.

2. Plate B.

3. Die flat side down with card base on top of it (they should be attached with the tape but make sure that the die is on the bottom of the cardstock with its flat side on plate B.

4. Three pieces of cardstock cut to roughly the same size as your plates.

5. A piece of tan embossing sheet (rubber sheet - Spellbinders makes these in 12x12 and 5x7 sizes).

6. Plate B.

This will allow your die to emboss but not cut through the cardstock.


Once you have ran it through the machine your window should look something like this. This tends to work best with a heavier cardstock but experiment a bit to see what works best for you.


Here's a finished card with the embossed window style.

Supplies: Cardstock (Stampin' Up!, Papertrey Ink), Stamps (Stampin' Up! - presents, Amuse Artstamps - sentiment), Ink (Stampin' Up!), markers (Stampin' Up!), red twine, Nestabilities (long rectangle and long scalloped rectangle).


You can make all types of window cards including repeat window cards. You may have seen the Sizzix Movers and Shapers dies that allow you to make repeat window cards. You can achieve a similar look with Nestabilities with a little patience and some measuring. First select a die that is large enough for you chosen stamp.


On the inside card front, lightly mark with pencil where your windows will be cut. I trace around the inside for easy placement. Put your die over the first window and run through your diecutting machine as with the first card. Repeat for each window.


When you're finished running it through the machine four times your card will look something like this. You can do this with any shape but it tends to work better with the smaller dies. Try different patterns and layouts for a one-of-a-kind card.


Here is the finished card. I chose to repeat the same image four times but you can also put a larger image behind the four windows to make it look like a paned window.

Supplies: Cardstock (Papertrey Ink, Bazzill, Stampin' Up!), embossing folder (Cuttlebug), ribbon, diecuts (Nestabilities: Label One, Scalloped Rectangle), Ink (Adirondak, Palette, Stampin' Up!), Stamps (Amuse Artstamps - tree, Close to My Heart - sentiment).


If you want to emboss your card front without cutting a window, follow the steps for embossing on card one and just skip cutting the window first. The sandwich again is Plate A, Plate B, die (flat side down), card front (right side down), 3 sheets of cardstock, tan embossing mat and Plate B. Your card front should like something like this once its gone through the machine.


This is my finished card using just an embossed card front. The embossing adds a touch of elegance and makes a very simple card stand out in a crowd.

Supplies: Cardstock (Prism), diecuts (Nestabilities - Long Rectangle, Quickutz - flourishes), punches (snowflakes), stamps (Technique Tuesday - sentiment), glitter (Glitter Ritz), scor-tape.

Saturday, November 15, 2008

Nestabilities:Tip #3

In edition to matting your images with Nestabilities diecuts you can also create amazing frames for your images by combining two diecuts together before cutting and embossing.


To make a frame with your dies, position two dies together in your diecutting sandwich. You can use whatever combination you fancy. In this photo I've used a square die with a scalloped square die. Take a piece of removable tape (I use Scotch brand in the blue container) and lay it across both dies to help keep their position when you put your sandwich together.


After you run it through your diecutting machine you should end up with a frame like this. The larger the outer die is compared to the inner die, the thicker the frame border will be.


Here's a really quick and simple project you can make using frames made from your Nestabilities. You will need a frame, a diecut made from the same die as your outside frame, a piece of white or cream cardstock slightly smaller than the frame, a piece of ribbon (about 7") and a stamp which will fit on the white cardstock.


Stamp and colour your image. Glue the white cardstock to the back of the frame using a thin layer of glue on the outside edge.


Fold the ribbon in half and attach both ends to the back of the white cardstock.


Glue the remaining diecut to the back of the frame to create a sandwich which will enclose the ribbon ends and hide the back of your stamped cardstock.


Embellish your ornament as desired and you have a very simple and quick project that you can finish up in no time!

Supplies: Cardstock (Bazzill, Stampin' Up!, Papertrey Ink), diecuts (Nestabilities - Scalloped Square - large, Quickutz - photo corners), Stamps (Stampingbella), Copic markers, glitter (Glitter Ritz), Ink (Adirondak), ribbon, pearls (K & Company)

Nestabilities: Tip #2

All my lofty plans for yesterdays entry went out the window when my daughter decided she didn't want to go to bed last night... In any case, tonight's "Why I love my Nestabilities" episode is all about matting!


Matting is probably the most common way you will see Nestabilities used. Their fabulous design makes them and ideal background for your stamped images or even photographs if you're a scrapbooker. Because they "nest" you can put several layers of graduated sizes together to make an interesting backdrop for your stamped images. For the best layered effect, use a combination of large and small sets. Don't worry that you have to go out and buy them all at once though - start with one size and build you collection from there. When I first purchased Nestabilities I bought only the large dies, then I added the small sets later.

Supplies: Cardstock (Bazzill, Papertrey Ink, Stampin' Up!), Stamps (Whipper Snapper), Copic Markers, ribbon, epoxy tag (Making Memories), ink (SU! - white craft, Adirondak), Diecut (Nestabilities Scalloped Square small and large, Classic Square)


Here's another card that uses layers of the same shaped die in different sizes (in this case the large and small label dies). To add some dimension and visual interest I've cut out two smaller poinsettias and popped them off the background. To create different levels in your images, use one layer of dimensional adhesives (such as pop dots) for one image and a double layer for the other.

Supplies: Cardstock (Bazzill, Papertrey Ink, Stampin' Up!), Stamps (Savvy - poinsettias, Stampin' Up! - sentiment), ribbon, Ink (Stampin' Up!, VersaMark), Diecut (Nestabilities Labels Small and Large)


You don't have to always use the same shape of die to mat your image. This card matches a Classic Square diecut with a Long Rectangle die cut. To add some texture to the long mat I ran it through an embossing folder. The label is also by Spellbinders.

Supplies: Cardstock (Bazzill, Papertrey Ink, Stampin' Up!), Stamps (Elzybels from Amuse Artstamps, Sunshine Designs - sentiment, Stampin' Up! - background snowflakes), embossing folder (Cuttlebug - snowflakes), embossing powder, brads, Copic markers, diecuts (Nestabilities: Classic Square, Long Scalloped Rectangle, Label)


You can mix it up by layering completely different shapes together. Here I've used a Classic Scalloped Oval with a Labels One die. The ribbon slide is also a Spellbinders die.

Supplies: Cardstock (Bazzill, Stampin' Up!), Stamps (Paper Salon), Ink (Stampin' Up!), markers (Stampin' Up!), flock (Doodlebug), diecuts (Nestabilities: Label One, Scalloped Oval, Ribbon Slide), ribbon, clear snowflakes (Heidi Swapp), rhinestones (Hero Arts)


You can also layer your dies horizontally or vertically across your card rather than one on top of the other in a stack. The background mats are all the same size but I've alternated red and white die cuts across the length of my card to mimic the look of a candy cane.

Supplies: Cardstock (Bazzill, Stampin' Up!, Papertrey Ink), Stamps (Sunshine Designs - candy cane, Stampin' Up! - sentiment), punch (Stampin' Up! - tab), Bella Baubles (Stampingbella), chalk, Copic markers, Ink (Palette, VersaMark), embossing powder.

There are endless ways to use Nestabilities to mat your images...experiment a bit and have some fun!

Thursday, November 13, 2008

My Favourite Things...Nestabilities

I've been neglectful of my poor blog this past week. Crazy work schedule and teething babies have unfortunately conspired against my creative pursuits...

Anyway - I'm back and I thought it might be fun to feature some of my favourite tools from time-to-time. I'm starting with Nestabilities from Spellbinder and over the next few posts I'll show you ten fun and fabulous things you can do with your Nestabilities.

The first time I saw these fantastic dies I was blown away and knew I had to have them as part of my tool collection. They are a great addition to any paper crafter's tool kit. Why, you might ask?

1. They are very easy to use - they work in almost all die cutting systems. The new packaging even has instructions for using them with different die cutter machines such as Cuttlebug, Revolution and Sizzix.


2. They are very light weight, small and easy to store. I can store between six and twelve of these dies in one CD case. Can you imagine translating that many die shapes into punches? The storage alone would be overwhelming.

3. They come in a variety of shapes and sizes - with usually five to six sizes of each shape in a package. They coordinate with one another so you can make double and triple mats.

4. Not only can you die cut the shape - but you can also emboss it! What versatility.


10 Great Things You Can Do with Your Nestabilities

#1: Make interesting card bases.

You can use your Nestabilities to make great card bases. There are a couple of ways to do this.


You can use a large Nestability die to make a card base. The Megabilities are great for this purpose. Here I'm using the largest of the long rectangle dies.


Die cut you paper, emboss if you desire and then fold your card in half. The card base is about 3 1/8" x 3 1/8" square.


Another way to make a card base with your Nestabilities is to place a pre-scored card over your die with the fold just below one edge of your die. I use removable tape to tape the card in place so it doesn't slip around when you make your Cuttlebug sandwich. Both layers of the folded cardstock should be on top of the die.


Run it through your die cutting machine and you have a great card base with a unique shape. I tend not to emboss these cards as the embossing won't go all the way around the front of the card (because of the gap at the top).


You can make card bases using any of your Nestability dies. Here is one using a large scalloped rectangle die.


And here is another using a large scalloped circle die.


Nestabilities are very easy to store. As mentioned earlier in the post, the majority of mine are stored in CD cases - usually two sets per case. I line the cases with adhesive magnetic paper and then pop the dies inside.

My larger dies (Megabilities) are too large to fit into CD cases so I've covered a hanging board with magnetic sheets and stick them up there. They hang over my craft desk so they are easy to access.


Here are a few simple cards I made using the card bases cut from the my Nestabilities.


Supplies: Cardstock (Bazzil, SU!, Papertrey Ink), Stamps (Technique Tuesday - Decoration an Rejoice sentiment, SU! - snowflakes, Amuse Artstamps - elf and Merry Christmas sentiment), ribbon, Cuttlebug embossing folder, embossing powder, Copic markers, ink (SU!, Adirondak, VersaMark)


Tomorrow I will showcase another fun way to use this great tool!